Gardening 101: You can do it!

Gardening 101
Think you can't garden? Think again!
Gardening can seem daunting, but it doesn't have to be! We believe in "neighbors teaching neighbors," and that's exactly what our annual Gardening 101 workshop is all about.
This guide is based on a session we hosted in 2022; it isn't a deep dive into every single gardening topic imaginable. Instead, think of it as your essential guide to understanding the basics, so you can confidently research your way to success! Our goal is to equip you with enough knowledge to know when you need help and how to find it, with your neighbors always ready to lend a hand.
Before You Plant: Define Your Gardening Purpose
The first and most crucial step for any new gardener is to ask yourself: What is your purpose? What are you trying to achieve?
Do you want to:
Grow delicious, fresh food?
Cultivate a beautiful, vibrant yard?
Attract pollinators and support local wildlife?
Contribute to your local ecosystem?
Understanding your goals will help you make informed decisions about your garden's design and plant selection.
Key Considerations
Key Considerations for Every New Gardener
1. Know Your Zone: Hardiness, Timing & Plant Selection
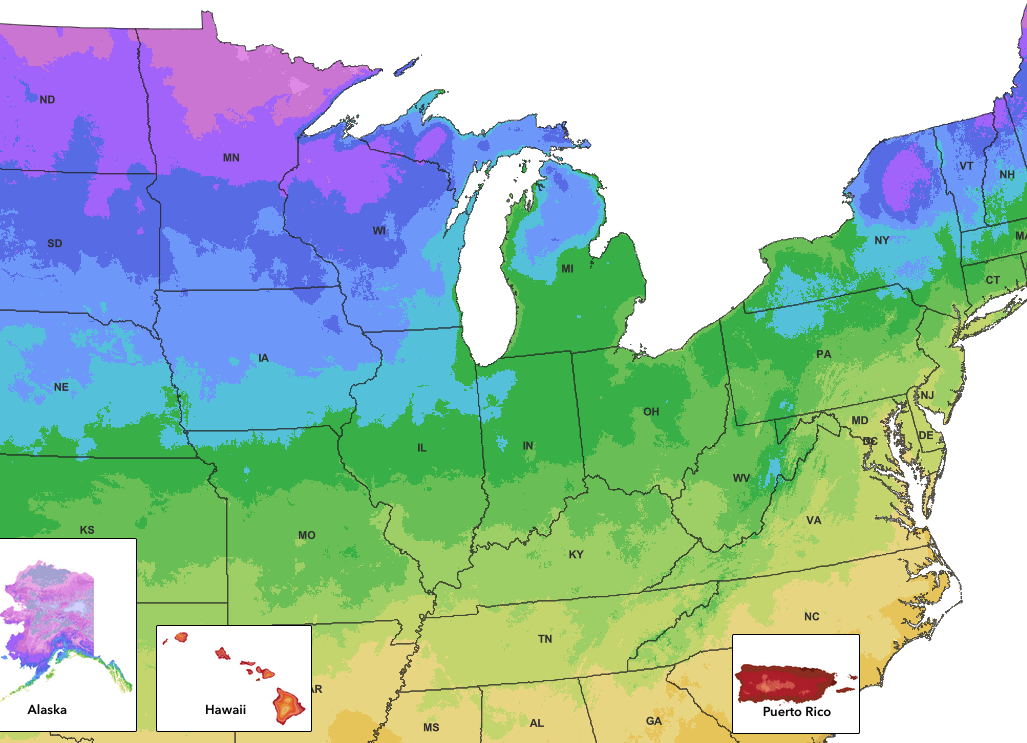
Understanding your hardiness zone is critical! This geographic area is defined by its average annual minimum temperature, a critical factor for plant survival. The USDA Hardiness Zone Map is your go-to resource. Each zone has sub-zones (Chicago is in 6a), and cities often have their own microclimates due to urban heat conditions.
Reading Seed Packets is Key! Seed packets are a treasure trove of information. Look for:
Hardiness Zone: If it says "hardy to zone 6," it's likely suitable for our Chicago winters (especially for perennials).
Planting Calendar: Many packets include a chart indicating the ideal planting times for various regions. For Chicago, May and June are often prime planting months.
Timing Your Seeds: There are two main ways to start seeds:
Indoor Seed Starting: You can start seeds indoors typically 8-12 weeks before your area’s last frost date (Mother's Day-ish, for Chicago). This gives your plants a head start for the season ahead.
Direct Sowing: You can typically plant seeds directly into the garden around May 15th, or when nighttime temperatures are consistently 50°F or higher. But remember, some "cold weather crops" like peas can be sown earlier, and some plants are best for fall planting. Always check your seed packet!
2. Sun Exposure: Mapping Your Light
Sunlight is a plant's fuel, so understanding the sun patterns in your yard is critical.
Full Sun: Requires six or more hours of direct sunlight per day.
Part Sun/Part Shade: Needs four to six hours of direct sunlight per day.
Shade: Thrives with less than four hours of direct sunlight per day.
Practical Tip: Spend a day observing your yard at different times. Sketch out your property, noting obstructions like buildings, fences, and trees. Mark areas that receive full sun, part sun, and shade throughout the day. This "sun map" will guide your plant selection. For urban gardeners with smaller lots, you often have to work with the light you've got – so choose plants that will truly thrive in your specific conditions!
3. Understanding Your Soil: Texture, pH, and Nutrients
Soil is the foundation of your garden. It's a mix of minerals, organic material (living and dead), air, and water.
Soil Texture:
Clay: Smallest particles, holds water and can be dense.
Sand: Largest particles, allows water and air to drain quickly.
Silt: Medium-sized particles, a good balance of water retention and drainage.
Soil pH: The pH scale (0-14) measures how acidic or alkaline your soil is. 7 is neutral, 0-7 is acidic, and 7-14 is alkaline.
Test Your Soil: The best way to know your pH is with an inexpensive soil testing kit from a hardware or garden store. These also often test for nutrient levels.
Chicago Soil: Our local soil tends to be slightly alkaline (often 7-7.5).
Plant Compatibility: It's vital to choose plants that prefer your soil's pH. For example, some plants thrive in acidic soil (like blueberries), and if planted in alkaline soil, they may suffer from chlorosis (yellowing leaves) due to nutrient lockout, even if the nutrients are present. While you can try to amend your soil's pH, it's often an uphill battle, especially for an entire yard. It's usually easier (and more cost-effective) to select plants suited to your existing conditions.
Nutrients (N-P-K): Soil tests will also reveal your levels of Nitrogen (N), Phosphorus (P), and Potassium (K) – the three primary macronutrients plants need. The numbers on fertilizer bags (e.g., 10-10-10) indicate the percentage of each nutrient. Your soil test results will help you determine if and what kind of fertilizer your plants might need.
4. The Power of Compost & Fertilizers
Compost: This "black gold" is decomposed organic matter, and a gardener's best friend.
Pros: Improves soil texture, makes nutrients more available to plants, increases aeration and drainage (yes, both!), supports beneficial soil microbes, buffers against soil changes, and allows you to repurpose kitchen scraps and yard waste.
Cons: Not many! Can be heavy and costly to purchase in large quantities. Avoid using it in pond gardens. Ensure diseased plant material is well-broken down if you’re composting it.
Fertilizers: Synthetic fertilizers offer precise nutrient boosts.
When to Use: Useful for correcting specific nutrient deficiencies (especially if your soil pH prevents nutrient uptake, like iron chlorosis in alkaline soil). Also helpful for container gardening where soil is finite.
Caution: Over-reliance can harm soil microbes and be costly. Quick-release fertilizers can lead to salt buildup in the soil, especially in dry conditions. Slow-release options are generally preferred for garden beds. And be thoughtful about where it comes from! Sourcing of fertilizers can be extractive, like kelp fertilizers may be destructively harvested.
Direct Sowing
Direct Sowing with Success
Here are some tips for if you're directly sowing seeds into your garden beds:
Prepare the Soil: Use a rake or hand fork to loosen the soil, break up any large clumps, and remove debris like sticks, rocks, or roots. Add any needed amendments (like compost!) to improve the soil. Finish by creating a level surface.
Determine Planting Depth: Your seed packet is your guide! Most packets list the ideal planting depth. Some seeds even require light to germinate and should simply rest on the soil surface, gently pressed into place.
Covering Seeds: If you have clay soil, which can crust over as it dries, consider covering your seeds with a light layer of commercial seed-starting mix instead of your garden soil. This helps prevent a hard crust that emerging seedlings can struggle to push through. Pat it gently.
Small Seeds: For tiny seeds like carrots, you can mix them with a bit of sand to aid in even distribution along your furrow.
Larger Seeds: Create a long furrow at the recommended depth, place seeds at the suggested spacing, and then cover with soil. Alternatively, use a pencil or bamboo stake to poke individual holes for each seed.
Water Gently: After planting, water with a gentle mist or shower. A strong spray can dislodge your precious seeds.
Consistent Moisture is Key: Keep the soil consistently moist for successful germination. In sunny spots, you might even need to water twice a day.
LABEL YOUR PLANTS! This is crucial! Use garden markers, stakes, string, or even plastic cutlery – anything that clearly identifies what you've planted where. You'll thank yourself later when all those tiny seedlings start looking alike (and avoid accidental hot pepper surprises!).
The Art of Thinning
Once your seeds have germinated, you'll often find many seedlings growing in a small area. This is where thinning comes in.
Why Thin? While it might feel counterintuitive to remove healthy seedlings, thinning gives your plants the necessary space to grow into strong, productive adults. Crowded plants compete for light, water, and nutrients, leading to smaller, less vigorous growth. For root crops like carrots, proper spacing is essential for well-formed, "sexy" vegetables!
How to Thin: Refer to your seed packet for recommended spacing. Instead of pulling up the seedlings you want to remove, snip them at the soil line with your fingernail or small clippers. This prevents disturbing the roots of the seedlings you want to keep.
Embrace thinning! It might feel difficult at first, but taking the time to properly space and thin your plants will ultimately lead to higher yields and healthier, more robust plants. Think like a farmer to maximize your harvest!
Transplanting
Transplanting Your Starts
If you've started seeds indoors or purchased plants from a garden center, you'll be transplanting them into your garden.
Know When to Transplant: The most important thing is to know when it's safe to put your plants outside. Many resources, like Johnny's (which offers an excellent online planting schedule calculator), can help you determine the ideal timing for various crops. Sometimes garden centers put plants out early, so be mindful of local frost dates.
Harden Off Your Seedlings: Your indoor-started plants have lived a pampered life! To prepare them for the elements (wind, direct sun, temperature fluctuations), you need to "harden them off."
Process: Gradually expose your seedlings to outdoor conditions over one to two weeks before transplanting. Start on overcast days, or place them in a shady spot initially. Increase their exposure to sunlight and wind each day.
Avoid Burn: Don't make the mistake of immediately putting tender seedlings in full, direct sun – you can burn them!
The Payoff: This slow acclimation significantly reduces "transplant shock" and sets your plants up for success.
Transplanting Technique:
Root-Bound Plants: If your plants are growing in plastic containers and their roots have circled the bottom (they're "root-bound"), gently remove the plant from its container. Tear off or prune the bottom layer of matted roots. This encourages new root growth and helps the plant establish itself more quickly in its new home.
Ease Shock: You can give your newly transplanted plants a light feeding to reduce transplant shock. Options include kelp fertilizers, fish emulsion (a fermented fish liquid, commercially available), or even a little molasses (a fermented sugar loaded with micronutrients). Just add a bit to your watering can.
LABEL YOUR SHIT! Seriously, do it! Especially when growing different varieties that look similar as seedlings. You don't want to confuse your hot peppers with your sweet peppers later on!
Watering
Watering Wisdom: Hydrating Your Garden
Watering might seem straightforward, but a little knowledge goes a long way.
Water Deeply and Infrequently for In-Ground Plants: For plants in your garden beds, it's generally better to water deeply every few days rather than a little bit every day. Deep watering encourages roots to grow further down, creating a stronger, more resilient plant. Remember, roots follow water!
Containers are Different: Plants in containers often need more frequent watering, sometimes daily, especially during hot weather.
Watering Systems: If you have many containers or a busy schedule, consider setting up drip irrigation or using hose timers. These systems can save you time and ensure your plants are consistently watered, even when you're away.
Watering Time Matters:
Morning is Best: Watering in the early morning is generally ideal. This allows the foliage to dry before nightfall.
Avoid Night Watering (if possible): If the air is still, watering at night can leave leaves damp for too long, increasing the risk of fungal diseases.
Bottom Watering: For potted plants, bottom watering (letting the pot sit in a tray of water) can also help keep foliage dry and reduce disease risk.
Prioritize Your Watering: If you're managing different types of plants, focus your watering efforts on those that need it most, like food crops. Consider planting drought-tolerant ornamentals in areas that receive less dedicated watering.
Get Growing!
Gardening is a journey of learning and experimentation. Start by understanding your space, your soil, and your desired outcomes. Don't be afraid to try new things, and remember, your AGA community is always here to support you!